If you’re looking to enhance your browsing experience Google Chrome offers a feature that lets you create multiple profiles tailored to your preferences. Whether you want to keep your work and browsing separate or share your device with others setting up a new Chrome profile is the perfect solution.
By following some steps you can easily create a new profile complete with its own set of bookmarks browsing history, passwords and more. Whats even better is that these profiles can be synchronized across devices ensuring a seamless browsing experience. In this guide we’ll take you through the process of adding a new Chrome profile and customizing it according to your needs. So lets dive in and explore how you can enjoy a browsing journey, with Google Chrome profiles.
What is a Chrome Profile?
Google Chrome profiles are a powerful feature that enables users to create and manage multiple profiles within the browser. By dividing your browsing experience into profiles you can enjoy a personalized and tailored experience for various purposes. Whether you want to keep your work and browsing separate share your computer with others or organize your online activities Chrome profiles provide a convenient solution.
A Chrome profile functions as a separate user account within the browser. Each profile can have its set of bookmarks browsing history saved passwords and other personalized settings. This means that you can have profiles, each with its own unique browsing environment.
How to Add a New Chrome Profile
Google Chrome offers users the ability to create multiple profiles, allowing for personalized browsing experiences tailored to individual preferences. Whether you want to separate work and personal browsing or share your device with others, adding a new Chrome profile is a simple process that can enhance your browsing efficiency. In this article, we’ll guide you step-by-step on how to add a new Chrome profile, customize it to your liking, and sync it across multiple devices for a seamless browsing experience.
Step-by-step Guide on Adding a New Profile
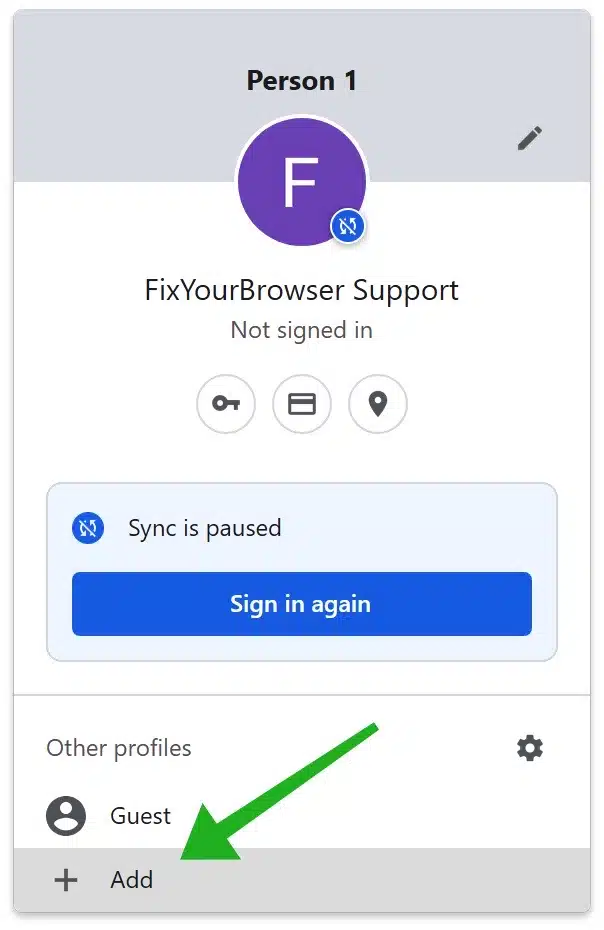
- Click on the Profile Icon: Open Google Chrome and locate the profile icon in the upper right corner of the browser window. The profile icon is represented by a circular image or your current profile picture.
- Select “Add”: Click on the profile icon, and from the drop-down menu, select “Add.” This action will prompt a new window to appear, allowing you to create a new profile.
- Choose a Name and Photo: In the new window, you’ll have the option to choose a name for your new profile. Select a name that best represents the purpose of the profile, whether it’s work-related, personal, or any other category that suits your needs. Additionally, you can choose a profile photo from the provided options for easy identification.
- Customize Theme Color: If you prefer a personalized touch, you can also customize the theme color of your new profile. Select a color that resonates with your preferences or helps differentiate the profile from others.
- Create Desktop Shortcut: If you plan to use the new profile frequently, you can create a desktop shortcut for quick access. Simply check the box that says “Create a desktop shortcut for this user” before finalizing the profile creation.
- Sign in or Use Guest Mode: After customizing the profile settings, you have the option to sign in with a different Google account or use guest mode for the new profile. This feature allows you to keep your browsing activities separate from your main account or maintain privacy when using public devices.
Customizing Your New Chrome Profile
Once you’ve successfully added a new Chrome profile, you can further personalize it to suit your preferences. Here are a few customization options available:
- Bookmarks and History: Each Chrome profile has its own set of bookmarks and browsing history. You can add new bookmarks, organize them into folders, and revisit your browsing history without affecting other profiles.
- Passwords and Autofill: Chrome profiles allow you to save passwords and autofill information independently. This feature ensures that your login credentials and form data remain distinct for each profile.
- Extensions and Apps: Customize your browsing experience by installing extensions and apps specific to your new profile. This way, you can tailor your Chrome functionalities to match your needs.
Edit Existing Chrome Profiles
If you want to make changes to an existing Chrome profile, simply follow these steps:
- Click on the Profile icon in the upper right corner of the Chrome browser window.
- In the dropdown menu, click on the wrench icon, next to “other profiles”.
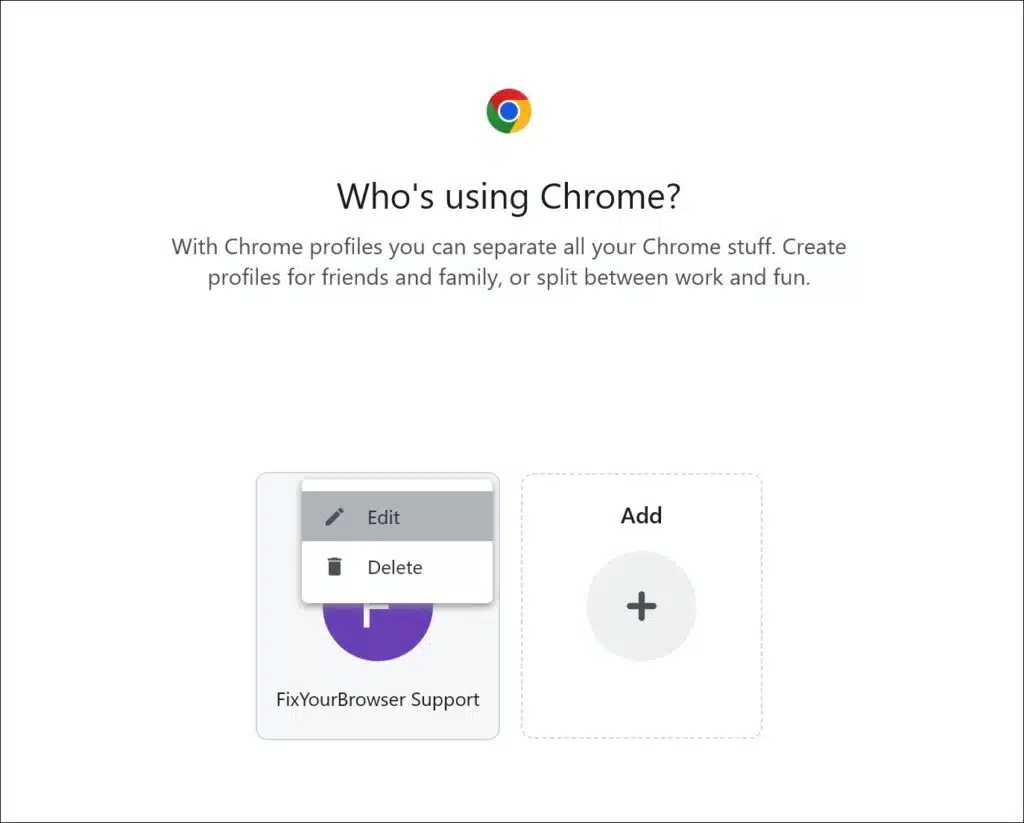
- In the “Who’s using Chrome” settings, click on the three dots above the profile you wish to edit.
- Click on “Edit” in the dropdown.
Delete Chrome profile
To remove a profile that you no longer need, follow these steps:
- Click on the Profile icon in the upper right corner of the Chrome browser window.
- In the dropdown menu, click on the wrench icon, next to “other profiles”.
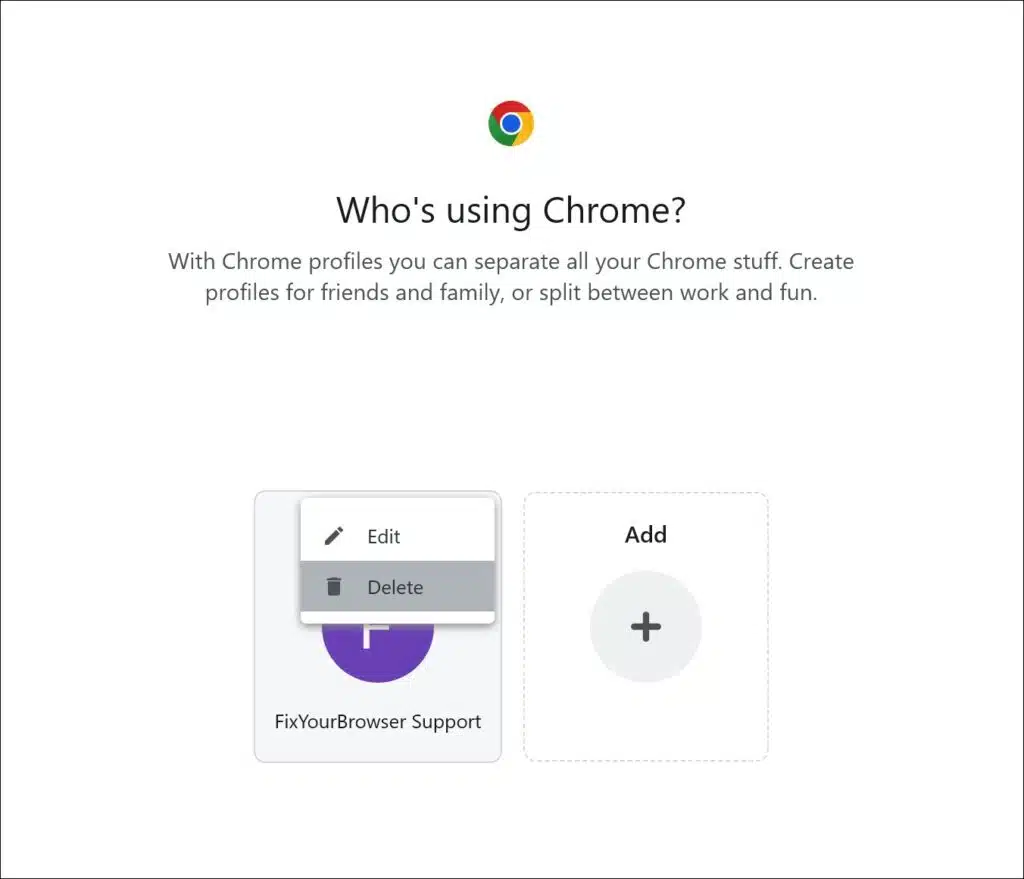
- In the “Who’s using Chrome” settings, click on the three dots above the profile you wish to delete.
- Click on “Delete” in the dropdown.
Please note that deleting a profile will permanently remove all associated bookmarks, history, passwords, and other content. Make sure to back up any important data before deleting a profile.
Change profile avatar
To quickly identify your different Chrome profiles, you can assign profile avatar. Here’s how:
- Click on the Profile icon in the upper right corner of the Chrome browser window.
- In the dropdown menu, click on the wrench icon, next to “other profiles”.
- In the “Who’s using Chrome” settings, click on the three dots above the profile you wish to change the avatar for.
- Click on “Edit” in the dropdown.
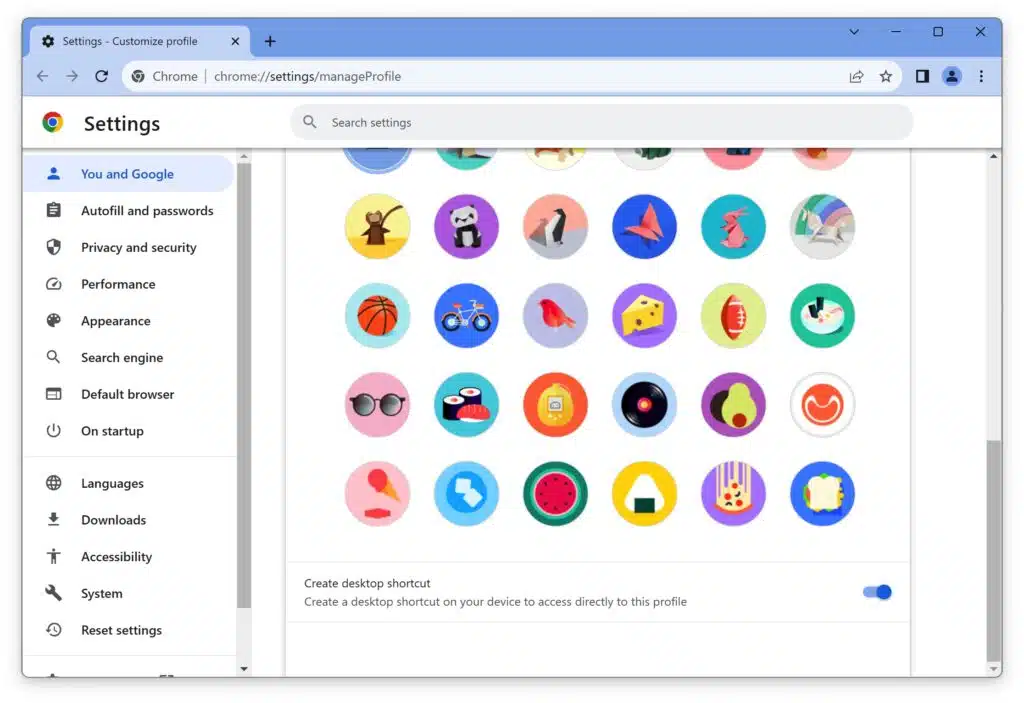
- In the “Pick an avatar” section, choose a new avatar for the available images.
![]()
Assigning profile avatar can be especially helpful when you have multiple profiles and want to switch between them seamlessly.
Use Guest profile
Another advanced option for Chrome profiles is the guest profile functionality. Guest profile allows users to browse the web without leaving any trace of their browsing activities. This is particularly useful when using a shared device or when users want to keep their browsing history private.
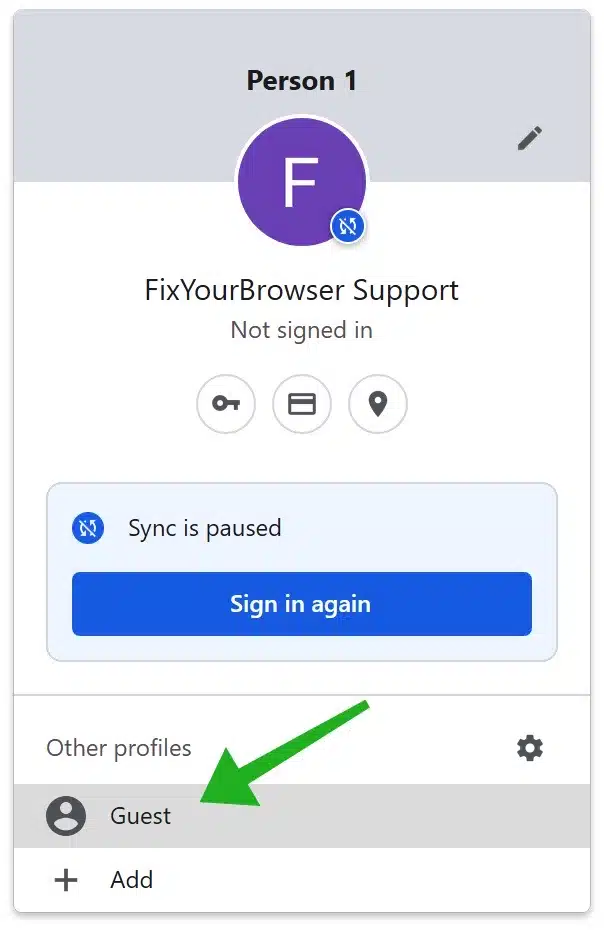
To access guest mode, click on the Profile icon in the upper right corner of Chrome and click on “Guest” in the “Other profiles” section.
A new window will open in guest mode, with a temporary profile that doesn’t save any browsing history, cookies, or site data. Once the guest window is closed, all browsing data will be deleted, providing a clean slate for the next user.

Create a Desktop Shortcuts for Quick Access
If you frequently use a specific Chrome profile, you can create a desktop shortcut for quick access. This allows you to open the profile directly from your desktop without having to navigate through the Chrome browser.
- Click on the Profile icon in the upper right corner of the Chrome browser window.
- In the dropdown menu, click on the wrench icon, next to “other profiles”.
- In the “Who’s using Chrome” settings, click on the three dots above the profile you wish to create a shortcut for.
- Click on “Edit” in the dropdown.
- Scroll to the bottom and click on “Create a desktop shortcut on your device to access directly to this profile”.
By utilizing the advanced options for Chrome profiles, such as signing in with different Google accounts, exploring guest mode functionality, and creating desktop shortcuts for quick access, users can enhance their browsing experiences and easily manage their online activities. Whether you need separate profiles for work and personal use or simply want to keep your browsing history private, Chrome profiles offer a range of customization options to suit your needs. So go ahead and add new Chrome profiles to optimize your browsing experience today.
Advantages of using Chrome profiles
There are several benefits, to utilizing multiple Chrome profiles. Firstly it enables you to separate your browsing activities from work related onesTo ensure that your work related bookmarks, extensions and browsing history are well organized and focused it is beneficial to create a profile dedicated to your professional tasks.
Additionally Chrome profiles offer the advantage of maintaining privacy and security when sharing your computer with others. By assigning each person their profile you can ensure that their personal information and browsing habits are kept separate, from those using the same device.
To ensure a browsing experience with your new Chrome profile you have the option to sync it across various devices. By signing in with your account and enabling syncing you can effortlessly access your profile on different devices like desktops, laptops and mobile devices. This synchronization guarantees that your bookmarks, browsing history, passwords and other content are readily available no matter where you are.
Switching between profiles is a breeze. Just click on the profile icon located in the right corner of Chrome and select the desired profile. Each browser window will display the profile photo in the Taskbar area making it easy to switch between profiles and identify them.
Best Practices for Profile Security
When it comes to managing profiles, security should always be a top priority. Here are some best practices to ensure the security of your Chrome profiles:
- Keep your profiles updated: Regularly update Chrome and your profiles to benefit from the latest security enhancements and bug fixes.
- Use strong and unique passwords: Assign a strong and unique password to each profile to prevent unauthorized access. Consider using a password manager to securely store and manage your passwords.
- Enable two-factor authentication: Add an extra layer of security to your profiles by enabling two-factor authentication. This will require you to provide a second verification factor, such as a code sent to your mobile device, when signing in to your profiles.
- Regularly review and remove unused profiles: If you no longer need a particular profile, it’s best to remove it to minimize the risk of potential security breaches. Click on the three-dot icon next to the profile and select “Remove” to delete an unused profile.
By following these tips and tricks for Chrome profile management, you can optimize your browsing experience, enhance productivity, and ensure the security of your online activities. Take advantage of the flexibility and customization options offered by Chrome profiles to tailor your browsing experience to your specific needs and preferences.
Learn more: 7 BEST security tips for the Google Chrome browser.
Troubleshooting Common Profile Issues
Creating and managing multiple profiles in Google Chrome can greatly enhance your browsing experience. However, like any technology, issues may arise from time to time. In this section, we will explore some common profile issues that users encounter and provide practical solutions to resolve them.
Profile Sync Problems and Solutions
One of the key benefits of using multiple Chrome profiles is the ability to sync your data across different devices. However, sometimes the sync process may encounter issues. If you find that your profiles are not syncing properly, there are a few steps you can take to troubleshoot the problem.
- Check your internet connection: Ensure that you have a stable internet connection. Syncing requires an active connection to transfer data between devices.
- Verify sync settings: Double-check that you have enabled sync for each profile. To do this, click on the Profile icon in the upper right corner of Chrome, and click on “Turn On Sync” and ensure that the toggle switch next to “Sync and Google services” is turned on.
- Sign out and sign back in: Sometimes, signing out of your Google account and then signing back in can help resolve sync issues. Click on the Profile icon, click on “Sync is on”. In the sync settings, click on “Turn off”. Now, sign back in.
- Clear cache and cookies: Clearing your browser’s cache and cookies can also help resolve sync issues. Go to Chrome settings, navigate to “Privacy and security,” click on “Clear browsing data,” and select the appropriate options.
Profile Data Loss Prevention
Losing profile data can be a frustrating experience. To prevent data loss, it’s essential to take proactive steps to safeguard your profiles. Here are a few strategies you can implement:
- Regularly back up your data: Make it a habit to back up your profile data regularly. You can use Google’s built-in sync feature to automatically back up your bookmarks, history, passwords, and other content. Additionally, consider using third-party backup solutions for an extra layer of protection.
- Enable Google Account recovery options: Ensure that you have recovery options, such as a secondary email address or phone number, associated with your Google account. This will help you regain access to your profile in case of any unforeseen circumstances.
- Use cloud storage for important files: If you have files saved within your profile that are critical to your work or personal life, consider storing them in cloud storage services like Google Drive or Dropbox. This way, even if you encounter profile issues, your important files will remain safe and accessible.
Resolving Profile Conflicts
When using multiple profiles, conflicts can arise when different profiles have conflicting settings or extensions. Here’s how you can address profile conflicts:
- Review and adjust settings: Go through the settings of each profile and ensure that there are no conflicting preferences. Pay particular attention to settings related to browsing history, cookies, and extensions.
- Disable conflicting extensions: If you notice that certain extensions are causing conflicts between profiles, try disabling them for the affected profiles. You can do this by going to Chrome settings, selecting “Extensions,” and toggling off the extensions causing conflicts.
- Reset Chrome settings: As a last resort, you can reset Chrome settings to resolve profile conflicts. Keep in mind that this will revert your browser to its default state, so make sure to back up any important data before proceeding. To reset settings, go to Chrome settings, scroll down to “Reset settings,” click on “Restore settings to their original defaults,” to reset everything.
By following these troubleshooting steps, you can overcome common profile issues and enjoy a seamless browsing experience with your Chrome profiles. Remember to regularly update Chrome and keep your profiles organized for optimal performance.
Conclusion
In conclusion, the ability to add new Chrome profiles is a highly beneficial feature that enhances the browsing experience for users. By creating multiple profiles, users can personalize their browsing settings, bookmarks, history, passwords, and other content. This level of customization allows for a more efficient and tailored web experience.
I hope this helped. Thank you for reading!